Wednesday, January 22, 2014

5 Tips SEO Mudah Yang Mungkin Anda Terlepas Pandang Sebelum Ini

5 Tips SEO Mudah Yang Mungkin Anda Terlepas Pandang Sebelum Ini


tips-seo-untuk-blog
Sejak kebelakangan ini, Google banyak mengeluarkan pelbagai bentuk kemaskini pada algorithm mereka sekaligus memberi kesan kepada kita sebagai penulis blog.
Setiap kali algorithm dilepaskan, maka akan timbul pelbagai rungutan dan cemuhan daripada golongan yang aktif dengan SEO.
Mahu tidak mahu, kita terpaksa akur dengan keputusan Google. Apa yang boleh kita buat adalah, menambah dan mempersiapkan diri dengan pelbagaiilmu-ilmu baru berkaitan SEO.
Pat Flynn dari Smart Passive Income ada berkongsi 5 tips mudah untuk SEO blog di saluran YouTube beliau. Tips-tips ini mungkin nampak simple, tetapi hakikatnya ramai dalam kalangan kita yang selalu mengabaikannya.
Tonton video di bawah untuk melihat & mendengar tips yang dimaksudkan:

Tips Mudah SEO Untuk Blog

Berikut adalah 5 tips yang dimaksudkan oleh beliau dalam video di atas:
#1 – Optimasikan Imej Sebaik Mungkin
Google bot seperti yang kita tahu hanya boleh membaca kandungan dalam bentuk teks sahaja. Ia tidak boleh membaca kandungan dalam bentuk gambar biarpun gambar itu dalam format apa sekalipun.
Justeru, 3 komponen terpenting apabila kita mahu memasukkan gambar di dalam artikel pada blog adalah:
  1. Nama fail gambar (contoh: biskut-raya.jpg).
  2. Title (contoh: biskut raya).
  3. Alternate tag (contoh: biskut raya).
Saya ada menulis lebih lanjut mengenai perkara ini dalam artikel sebelum ini.
#2 – Pendekkan Permalink
Jika kita menerbitkan artikel bertajuk ‘5 Cara Untuk Hilangkan Rasa Mengantuk Ketika Di Dalam Kelas‘, sistem WordPress secara automatik akan menulis URL artikel ini seperti berikut:
www.blog-kita.com/5-cara-untuk-hilangkan-rasa-mengantuk-ketika-di-dalam-kelas/
Dalam konteks SEO, kita boleh memendekkan lagi URL di atas menjadi:
www.blog-kita.com/cara-untuk-hilangkan-mengantuk/
Dengan memendekkan URL permalink, ia akan memberi nilai tambah kepadaOn Page SEO blog kita.
#3 – Bina Akaun Google+ Untuk Blog
Google+ merupakan rangkaian media sosial di bawah jenama Google. Apa yang boleh kita buat sebagai pemilik blog adalah, membuka sebuah akaun Google+ for Business untuk blog kita.
Seterusnya, tambah URL blog kita di bahagian About pada profil akaun tersebut. Backlink yang datang daripada Google+ ini merupakan antara backlink yang tinggi & ‘mahal’ nilainya dalam SEO.
#4 – Mula Bina Akaun YouTube (Dan Buat Video)
Seperti yang saya tulis pada artikel sebelum ini, bermula tahun ini dan seterusnya, kandungan berbentuk video akan semakin bertambah dan semakin digemari oleh pengguna Internet.
Oleh itu, ambil kesempatan ini untuk buka sebuah channel khas di YouTube dan terbitkan kandungan video pertama anda dan sertakan pautan-pautan menarik ke blog. Ini juga dikira backlink yang baik.
Jika anda sudah mempunyai akaun YouTube, langgan channel Bina Blog Dot Com Sendiri di sini ya!
#5 – No Follow Pautan Yang Kurang Penting
No follow tag merupakan antara kod HTML terpenting dalam dunia SEO. Apabila kita menyertakan pautan keluar ke mana-mana laman web atau blog yang kurang penting, kita sebenarnya telah ‘mengalirkan’ autoriti blog kita kepada laman web dan blog tersebut.
Oleh itu, berhati-hati dalam ‘memberi backlink’. Jika ianya benar-benar bermanfaat kepada pembaca, maka tidak mengapa untuk berikan ‘do follow backlink’. Sebaliknya, jika ia kurang penting seperti laman-laman jualan affiliate, maka sertakan no-follow tag pada pautan tersebut.
***
Kesimpulannya, 5 perkara di atas sebenarnya bukan perkara baru dalam SEO. Cuma mungkin ia nampak simple dan kita mengabaikannya sebelum ini.
Jangan abaikan perkara-perkara kecil seperti ini kerana mungkin perkara-perkara kecil seperti ini boleh membezakan ranking blog anda di Google kelak.
Kredit foto: Piutus.

Wednesday, January 8, 2014

Tips dan Teknik Blog Terima 50K Pageviews Dari Satu Entri

Tips dan Teknik Blog Terima 50K Pageviews Dari Satu Entri

Tips Terima 50K Pageviews Dari Satu Entri

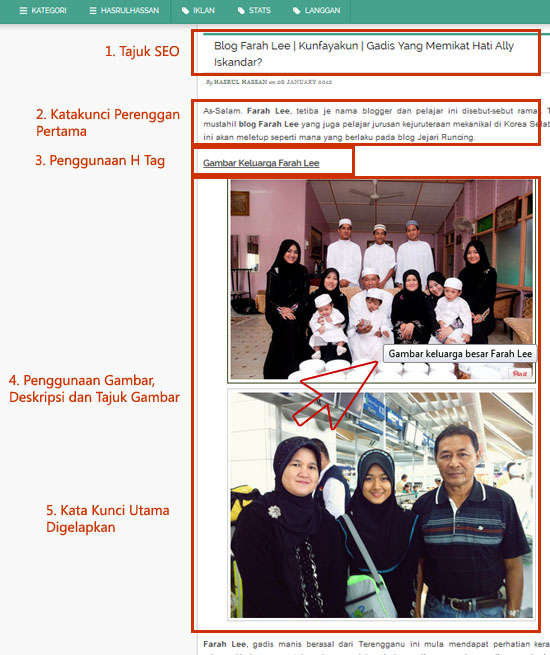
Berdasarkan contoh yang saya berikan di atas ini, ada 5 perkara perlu dititik-beratkan untuk terima trafik tinggi hanya dari satu entri.

5 Teknik Dapatkan 50K Pageviews Menerusi Satu Entri

  1. Tajuk SEO (Search Engine Optimization) - Dengan kata kunci Farah Lee, ia divariasikan menggunakan beberapa kata kunci yang ada kaitan dengan Farah Lee, iaitu nama blognya - Kunfayakun, dan nama suami Ally Iskandar - dan ia dilakukan secara tidak langsung.
  2. Katakunci pada Perenggan Pertama Entri - Mesti pastikan kata kunci atau variasinya berada di bahagian pertama perenggan entri blog anda.
  3. Penggunaan H Tag yang Betul - Entri mesti ada struktur yang betul, seperti menulis karangan - ada tajuk utama, ada tajuk kecil - dengan masukkan variasi katakunci.
  4. Penggunaan Gambar berserta Deskripsi - Gambar perlu ada variasi katakunci pada bahagian title dan juga alt img. Namakan juga tajuk gambar tersebut; contohnya: Gambar-Famili-Farah-Lee.jpg
  5. Gelapkan (strong/bold) Kata Kunci - Cuba untuk pilih katakunci yang betul dan gelapkan dalam entri blog anda. Jangan buat terlalu banyak atau obvious. Cukup sekadar setiap 2-3 perenggan ada variasi katakunci digelapkan.

Tips Tambahan Terima Trafik Tinggi dari Satu Entri

Sebagai tambahan, entri tersebut mesti ada pautan luar berkenaan. Contohnya seperti contoh entri yang saya sediakan di atas, ada pautan ke blog Farah Lee. Jika guna gambar pinjam dari mana-mana, diletakkan kredit yang sepatutnya. 

Mudah je kan? Cuma nak kena teliti dan rajin sedikit.

Ini merupakan antara teknik asas dan mudah untuk entri blog anda menerima trafik yang tinggi, dan seperti yang saya telah tunjukkan ini, entri ini sahaja telah menyumbang lebih daripada 50 ribu trafik kepada blog www.hasrulhassan.com ini.

Dan paling best, ia merupakan trafik berterusan. Berterusan kerana walaupun ia entri lama, namun ia masih lagi menyumbang trafik ke blog ini setelah ditulis dan diterbitkan lebih setahun yang lalu!

Semua tatacara untuk lakukan 5 perkara yang saya sebutkan tadi telah diperincikan di dalam terbitan yang lalu. Anda boleh cuba gelintar (search) dalam blog ini menggunakan fungsi carian yang telah saya sediakan.

Selamat mencuba dan menerima trafik 50K (pageviews) dari satu entri!

Baca Selengkapnya - Tips Terima 50K Pageviews Dari Satu Entri http://www.hasrulhassan.com/2013/08/tips-terima-50K-pageviews-satu-entri.html#ixzz2psf8uYDg
Under Creative Commons License: Attribution Share Alike
Follow us: @hasrulhassan on Twitter | bloghasrulhassan on Facebook

Website yang ada rujukan tips SEO

www.hasrulhassan.com/

Ubah Setting Pada Robot untuk SEO Blogspo

Ubah Setting Pada Robot untuk SEO Blogspot

Saya mahu kongsikan satu cara (antara) yang paling mudah untuk membolehkan blog blogspot anda mesra dengan enjin carian. Namun, anda perlu lakukan dengan berhati-hati agar tidak tersilap, kerana andai kesilapan berlaku, blog serta entri anda mungkin tidak langsung akan berada di enjin carian.

Kaedah yang akan saya kongsikan ini memerlukan anda untuk ubah dan edit setting pada robot.txt blogspot anda. Jangan risau, ikuti dengan rapi apa yang akan saya berikan ini, dan in Sha Allah, semua akan ok. 

Salin kod di bawah ini selengkapnya. 

User-agent: Mediapartners-GoogleDisallow:User-agent: *Allow: /Sitemap: http://link-blog-anda.blogspot.com/feeds/posts/default?orderby=updated


Kemudian, sila ke dashboard blogspot anda, dan unjur ke bahagian Settings. Dan pilih bahagian Search preferences, lihat bahagian Crawlers and indexing, dan klik edit pada bahagian Custom robots.txt.
Paparan di bawah berikut akan keluar, dan kini paste kod yang telah anda salin tadi di dalam kotak yang disediakan. Klik Save Changes. Dah siap. Sekarang, blog dan entri punyai peluang untuk disenaraikan di enjin carian. Jangan lupa ubah http://link-blog-anda.blogspot.com kepada URL blog anda.

Kaedah mudah ini mesti anda selaraskan di Google Webmasters Tool di mana anda boleh tingkatkan lagi keupayaan blog anda untuk disenaraikan di enjin carian terutama di laman utama.

Selamat mencuba.

Baca Selengkapnya - Ubah Setting Pada Robot untuk SEO Blogspot http://www.hasrulhassan.com/2013/09/ubah-setting-pada-robot-untuk-seo.html#ixzz2pryuR1BB
Under Creative Commons License: Attribution Share Alike
Follow us: @hasrulhassan on Twitter | bloghasrulhassan on Facebook

Tips mudah SEO untuk blogger


Teramat rugi jika blog sudah terindeks pada google search engine, tetapi kita tidak menggunakan sebaik-baiknya peluang yang ada untuk mengiklankan blog secara berkesan dan percuma.

Asas SEO yang mesti kita tahu supaya blog terindeks dengan cepat adalah dengan tidak menyusahkan sipder Google untuk merayap ke blog kita.


Gunakan ejaan yang betul.

Antara perkataan aku dengan ak, yang mana satu kita rasakan akan mesra dengan search engine. Cuba taip perkataan ak pada google search dan lihat, result yang terpapar ialah ak-47. Hebat bukan? Dalam entri pun cerita pasal senapang. Sudah-sudahlah main perang kombat masa kanak-kanak dulu. Kurang-kurangkanlah bahasa sms kalau rasa nak blog tersenarai pada search engine.

Spider google mesti menyampah dengan penggunaan simbol yang pelik dan bahasa sms. Spider itu dah dididik dengan penggunaan ejaan yang lengkap. Jadi, jika blog kita sudah terindeks, tetapi tidak di crawl, mungkin spider Google hanya melepak di depan pintu blog kita sambil makan jagung.

Ping blog di Pingler.com

Setiap kali bila post entri terbaru,cepat-cepatlah ping blog kita di Pingler.com ataupingmyblog.com. Tujuannya supaya spider Google akan terus merayap pada post yang baru di ping dan scan setiap perkataan pada entri tersebut tanpa terhegeh-hegeh. Kalau tidak di ping dan mengharapkan cara manual, spider Google akan merayap secara berlenggang kangkung, dan kadang-kadang terus malas nak crawl.

Penggunaan keyword mudah pada entri.

Untuk belajar menggunakan keyword, permulaannya, kita hanya perlu gunakan keyword yang rendah rankingnya. Contohnya, nescafe ais. Dalam entri tersebut, kita selitkan beberapa perkataan seperti cara, buat, minum, kesan, sedap dan yang sesuai dan relevan pada perkataan suggestion di Google Search. Ini bertujuan, apabila perkataan cara buat nescafe ais atau nescafe ais sedap atau cara buat nescafe ais sedap atau kedai nescafe ais atau buat nescafe ais atau kesan minum nescafe ais di taip pada google search, mungkin blog kita akan tersenarai di 10 website atau blog yang teratas berdasarkan value keyword itu.

BlogSpot Advanced SEO Preference: Robots.txt, Redirection, Meta Tag

single post SEO BlogSpot BlogSpot Advanced SEO Preference: Robots.txt, Redirection, Meta TagToday, seems to be a happy Blogger day for BlogSpot user as BlogSpot added some of the advanced SEO options for Blogger blogs. We will dive into all the new feature in details after a break but let me start with some of the out of the topic talk.
When ever we pitch about BlogSpot Vs. WordPress, we always give WordPress an edge in terms of SEO. By adding new SEO features in BlogSpot, Google have fixed the SEO difference by a great extent. Though, this is not going to be “The changes”, which will make me suggest you to stick to BlogSpot for professional Blogging. But, all the new changes are certainly deserve an applause as after years, BlogSpot bloggers got much needed SEO love.
So, lets not waste our time and learn about all new features and how to use it.

How to Enable BlogSpot Advanced SEO settings?

Login to your Blogger dashboard and under settings > search preference you will find all the new SEO options which is added by Blogger team. You have to enable all the settings one by one, and my suggestion is to read this guide seriously else a wrong settings (BlogSpot Robots.txt), may lead to complete de-indexing of your blog.
BlogSpot Advanced SEO settings BlogSpot Advanced SEO Preference: Robots.txt, Redirection, Meta Tag
I don’t meant to scare you, but all I’m saying is it’s time to get serious as Google wants to take SEO very seriously. Period!.
In this iteration, here are new SEO features added by Blogger team:
  • Description meta tag:
  • Custom 404 page message
  • Custom redirects (Redirect 404 pages to any page on your blog).
  • Custom robots.txt
  • Custom Robots header tags
  • No follow tag, open link in new tab

Lets Dive into World of BlogSpot Search preference settings:

Lets, look into all the feature one by one and my suggestion implement it on your blog for better search engine optimization of your Blogger blog.
Description Meta tags:
BlogSpot Meta tags BlogSpot Advanced SEO Preference: Robots.txt, Redirection, Meta Tag
This is where you will be explaining what your blog is about. An informative description within 150 character will help readers to understand about your blog and will help you to get more click from search engine. Also, from SEO perspective, I would suggest you to use your main keyword here in BlogSpot meta tags description. For ex:
ShoutMeLoud is a Blogging hub for Bloggers and Internet marketers to learn about tricks of Blogging, WordPress, Affiliate marketing, SEO and how to make money online.
Make sure you explain about your blog within 150 characters, as search engine ignore characters after 150. Once you enable this feature and added meta tags, after search engine bot recrawl your site, search engine will show your meta description like this in search engine:
description meta tags in search engine result BlogSpot Advanced SEO Preference: Robots.txt, Redirection, Meta Tag
Custom 404 message:
A 404 page is usually a mistyped pages or a visitor land on a page, which doesn’t exceed. This custom 404 message will let you create custom HTML message, which you can display on your Blogger 404 pages. Now, it’s time for you to use your creativity and design something awesome.
BlogSpot 404 Pages BlogSpot Advanced SEO Preference: Robots.txt, Redirection, Meta Tag
Here is one example, HTML message which I have created and you can change the link and text to spice up your 404 page on BlogSpot.
Seems like Internet is broken,
and you landed here by mistake. But, I got something special for you andI picked the best pages from my site here. Check out my top 5 hand picked post:


<p>&#160;</p>

<ul>
  <li><a href="http://www.shoutmeloud.com" target="_blank">How to be the king of the world

  <li><a href="http://www.shoutmeloud.com" target="_blank">How to kill an elephant by smile</a></li>
</ul>

<p>If you lost the heart to browse my site, you can still poke me on Facebook <a href="http://Facebook.com/ShoutMeLoud" target="_blank">here</a>.</p>
Custom redirects:
Custom redirects BlogSpot Advanced SEO Preference: Robots.txt, Redirection, Meta Tag
This is very useful, when any 3rd party site linked to your site and added a link which doesn’t exist or if you remove a page and want to redirect the traffic. You can use Google Webmaster tool to find all such 404 pages and set the redirection. It might be little lengthy process, but in some cases it is very useful to tap the missing traffic and convert them into real traffic.
Nofollow/Open in new tab:
BlogSpot nofollow link rel BlogSpot Advanced SEO Preference: Robots.txt, Redirection, Meta Tag
Before, I go into detail of this post, my suggestion is to read my post on Bounce rate and that will give you enough idea about why opening external links in new tab is important. Now, when ever you link to a site from post editor, it will give two new options : Add nofollow attribute and Open in new tab.
If word, nofollow sounds like a rocket science to you, read my post on why you need to add nofollow tag to a link. Earlier, we used to add nofollow link attribute using HTML, but this new one click link addition will make task very easier. Mmy suggestion use nofollow link attribute only when you have to link to irrelevant domains and pages which doesn’t add any value.
For example: use it, when you are writing about some anti-hacking trick and you have to link to hacking sites for giving examples.
Robots.txt for BlogSpot:
Well, this is one part of new BlogSpot SEO setup, that I want you to use it carefully. A wrong, settings may lead to deindexing of a big part of your site. A Robots.txt file is use to stop search engine bots from crawling the “Not so important” part of your blog. For example, Search pages, archive pages and so on.  If you are new to Robots.txt, this video by Google Engineer, Matt Cutts will give you enough basic info about BlogSpot robots.txt file:
In nutshell, I suggest you to use Robots.txt to point to your sitemap URL and control No-indexing by noindex tag in custom robots meta tags. For more information, read official page on BlogSpot robots.txt. I will cover a detailed info on Blogger robots.txt in coming days.
Custom robots header tags:
Custom robots header tags BlogSpot Advanced SEO Preference: Robots.txt, Redirection, Meta Tag
One much needed feature for SEO of your BlogSpot blog, though it looks like little confusing but this guide from Google will again try to explain everything in simple words.
Here is an image, which explains all the directives under Blogger custom Robots header tag:
Custom robots header tags meaning BlogSpot Advanced SEO Preference: Robots.txt, Redirection, Meta Tag
Robots meta tag and description is also available on single post, which makes it more search engine friendly. Specially, I liked the idea of Unavailable_after directive, which will help you to automatically deindex news post which usually expires after some time.
Well, my suggestion for every BlogSpot blogger is to get a custom domain and enjoy the power of new BlogSpot SEO and drive more traffic to your blog post. If you have any query regarding above Blogger new search preference option, ask via comment.  If you find this post useful, don’t forget to share and +1 this post.

How to optimize Images and Increase Blog Traffic

This tutorial will explain you how to optimize images before uploading them to internet. Generally most of people don't optimize images before uploading it to Blogger as needed. Optimizing images should be done when talk about the SEO (Search Engine Optimization). Learning the correct and proper way of optimizing images in blogger is important. Google Image search is used widely for finding quality reference images, icons and photos. A great percentage of our blog traffic depends on Image search. When we are downloading images, most of the time they are saved with very odd names and we don't take any interest in modifying the name. So you should always consider two things when uploading images to Internet these are proper use of alt tag and image name should be change with proper keyword. Let me explain..

1. Change Image Name with Keyword
see in the screenshot
When we are downloading images from Internet, generally they are saved in local drive with some very odd name like untitled.jpeg, img1.jpeg etc. So changing these names with appropriate keywords is always helpful. For example, if i want to add img1 or untitled in this post then definitely i will change these name with those words which describe the content called keywords so i will change to image SEO.jpeg or optimize image.jpeg.


2. Use alt attribute

Search robots can not read multimedia may it be graphic images or flash. An image is meaningless for search spiders if it is not defined(tagged). So to tell search robots what the image is all about, we can add an alt tag to our image code. When you add a photo to your post editor, switch to "Edit HTML" mode and find the HTML code for the image which will look something like this:

<div class="separator" style="clear: both; text-align: center;">
<a href="https://blogger.googleusercontent.com/img/b/R29vZ2xl/AVvXsEg2G9480Hqsoxp3KpsKqY6ghxHlgBfJqUbBDNfaW-qYE_lqcuZ4z3NyaCvncSmU1r_GR-vDrccwq9b5gEvSU4pPR4Uqqbpbcv_fv79YuOAFsHHUsHer64_wYR02ELs81vu5ajrsbNOWAni8/s1600/how+to+seo+optimize+blogger+posts+titles.jpg" imageanchor="1" style="clear: left; float: left; margin-bottom: 1em; margin-right: 1em;"><img border="0" height="104" src="https://blogger.googleusercontent.com/img/b/R29vZ2xl/AVvXsEg2G9480Hqsoxp3KpsKqY6ghxHlgBfJqUbBDNfaW-qYE_lqcuZ4z3NyaCvncSmU1r_GR-vDrccwq9b5gEvSU4pPR4Uqqbpbcv_fv79YuOAFsHHUsHer64_wYR02ELs81vu5ajrsbNOWAni8/s200/how+to+seo+optimize+blogger+posts+titles.jpg" width="100" /></a></div>

Now you need to identify the HTML code of the image which is marked with red. Just add the underlined alt tag after <img as shown below:

<div class="separator" style="clear: both; text-align: center;">
<a href="https://blogger.googleusercontent.com/img/b/R29vZ2xl/AVvXsEg2G9480Hqsoxp3KpsKqY6ghxHlgBfJqUbBDNfaW-qYE_lqcuZ4z3NyaCvncSmU1r_GR-vDrccwq9b5gEvSU4pPR4Uqqbpbcv_fv79YuOAFsHHUsHer64_wYR02ELs81vu5ajrsbNOWAni8/s1600/how+to+seo+optimize+blogger+posts+titles.jpg" imageanchor="1" style="clear: left; float: left; margin-bottom: 1em; margin-right: 1em;"><img alt="image description" border="0" height="104" src="https://blogger.googleusercontent.com/img/b/R29vZ2xl/AVvXsEg2G9480Hqsoxp3KpsKqY6ghxHlgBfJqUbBDNfaW-qYE_lqcuZ4z3NyaCvncSmU1r_GR-vDrccwq9b5gEvSU4pPR4Uqqbpbcv_fv79YuOAFsHHUsHer64_wYR02ELs81vu5ajrsbNOWAni8/s200/how+to+seo+optimize+blogger+posts+titles.jpg" width="100" /></a></div>

Replace image description with your own keywords. And try to write short sentences to describe them, also keep description limited to 4-5 words. Less is better.
Tips & Tutorial Group Shaklee. All rights reserved. © Maira Gall.